Then check where its files have been installed. If you're using a recent installation, you'll probably find all its files in the directory
C:\Program Files\MiKTeX 2.7\miktex\bin.Verify that. If that is not the case on your computer, figure out what is the correct answer, so that you'll be prepared for the questions below.
Next, I would recommend that you install Ghostscript (first) and Gsview (second). These are discussed on another page. After you've installed these, check
where Gsview is installed on your computer; you'll need that information in a few minutes. On my computer, it is located at
Next, install TxC. (I don't know about your computer, but on mine, TxC installed properly and then the computer crashed. However, when I restarted the computer, everything was okay, including TxC.) The following instructions are for TxC version 1b7.50, which installs more easily than earlier versions. The first time you run TxC, it will run its Configuration Wizard, to set itself up. It will ask you a few questions. Following are some answers.
Next, adjust Yap's settings. Go to "Start" "Programs" "Miktex 2.7" "Previewer" to start up Yap (which stands for "Yet another previewer," but in my opinion this previewer is much better than any other DVI previewer that I've ever seen). Now, in Yap, go to "View" "Options ..." "Inverse DVI Search". You should see, among the options, "TeXnicCenter (autodetected)". Click on that line, and you should see something about TEXCNTR.EXE copied automatically into the box that is labeled "Command line." Now click on "OK." To see what this accomplishes, read my discussion of forward and inverse search. I consider those searches to be incredibly helpful, and I've never seen any other DVI previewer that can do both of them.
Find the directory "C:\localtexmf\miktex\config", and in it put a copy of miktex.ini. Edit the lines you want to edit, and delete all the other lines.
Here's why: (1) Whenever you run Miktex, it will first look in the texmf version for basic configuration, and then look in the localtexmf version for further settings or resettings. Thus, you still get the effect you want. (2) When it comes time to update your copy of Miktex (perhaps once a year or so), the texmf version will get overwritten with a new version, but your localtexmf version will be preserved the way you want it.
After you create the local config file, you'll need to refresh the filename database, so that Miktex knows it's there. (See remarks earlier on this page.)
I will now describe a defect that I found in this error handling, and a solution that I eventually discovered. Here is a typical line from my log file:
7.
The warning refers to a minor, easily-correct problem on line 87 of my source file. Unfortunately, the default configuration setting had my log outputs something like 78 columns wide. That's one column too short for this particular message; the number "87" got cut off in the middle; the "7" appears on the next line. TeXnicCenter ignored the "7", and looked for the error on line "8". That's not so helpful to me. Even worse were some other warning messages, where the entire line number got cut off and sent to the next line of output; in these cases, TeXnicCenter simply took me to line 1 of the source file. Not what I wanted.
Here's how to fix it:
First, edit the "C:\localtexmf\miktex\config\miktex.ini" file (mentioned earlier on this web page). Add this line to it:
max_print_line=200(Then refresh the filename database.)
But now you won't be able to read the output window, because
its display lines will be too long! To fix that, we still
have to make another alteration.
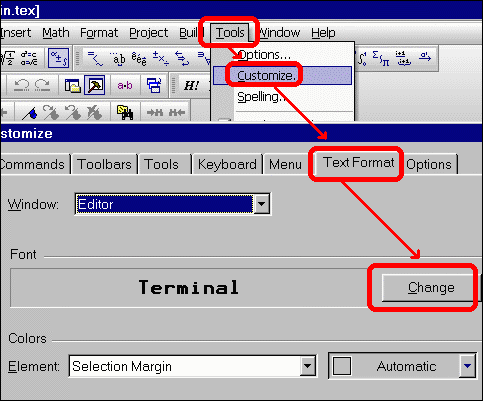
In TeXnicCenter, go to
"Tools" "Options..."
You can also change the color scheme itself if you wish; the appropriate box is right below the fonts box. I haven't changed mine, but perhaps you have some specialized reason for wanting to change yours.
In Windows Explorer, click "View" -- "Folder Options" -- "File Types". Look at the list of filetypes. If Tex isn't listed there, click "New type..." and fill in the basics (and choose an icon that you like, too -- I like lions because that's what Knuth used when he first created Tex). If Tex is listed there, select it and click "Edit..." (or in some versions of Windows, click "Advanced").
Then, under "Actions", click "New...". Type "TeXnic Center" (or "Txc", or whatever you like) for the "Action". For "Application used to perform action", type exactly what I have typed:
"C:\Program Files\TeXnicCenter\TEXCNTR.EXE" /ddecmd "[open('%1')]"(To avoid typograpical errors, don't retype it; just use copy-and-paste.) Finally, click "OK", "OK", "OK".
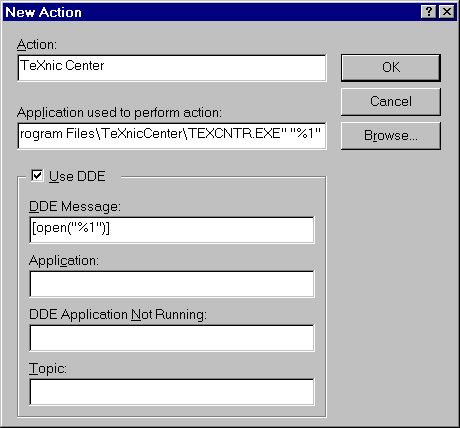
(I was tempted to use the little "Use DDE" box that you see in the picture. I experimented extensively with it but couldn't get it to work with TxC. If you get it to work, let me know. The procedure I've described above does work, at least on my computer.)
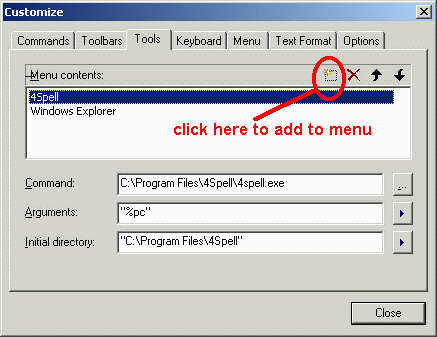 In TeXnic Center, under "Tools", you'll see "Windows Explorer". That was included
in the default setup as an example. You can add whatever tools you like under
"Windows Explorer" (and you can also remove "Windows Explorer" if you don't want
it there). But adding tools is a little tricky; you have to get the commands just right.
Here are some of the tools that I've found useful to add to TxC:
In TeXnic Center, under "Tools", you'll see "Windows Explorer". That was included
in the default setup as an example. You can add whatever tools you like under
"Windows Explorer" (and you can also remove "Windows Explorer" if you don't want
it there). But adding tools is a little tricky; you have to get the commands just right.
Here are some of the tools that I've found useful to add to TxC:
4Spell | |
| Command: | |
| Arguments: | |
| Initial directory: | |
new Yap this project |
| Command: | |
| Arguments: | |
| Initial directory: | |
new Yap this file |
| Command: | |
| Arguments: | |
| Initial directory: | |
dvipdfm this project |
| Command: | |
| Arguments: | |
| Initial directory: | |
dvipdfm this file |
| Command: | |
| Arguments: | |
| Initial directory: | |
dos box in this file's directory |
| Command: | |
| Arguments: | |
| Initial directory: | |
Setting things up that way is a little tricky. The setup procedure starts in the usual fashion (outlined in my discussion of file associations for Windows programs):
In Windows Explorer, click "View" -- "Folder Options" -- "File Types". Look at the list of filetypes. If Tex isn't listed there, click "New type..." and fill in the basics (and choose an icon that you like, too -- I like lions because that's what Knuth used when he first created Tex). If Tex is listed there, select it and click "Edit..." (or in some versions of Windows, click "Advanced"). Then, under "Actions", click "New...". Type "TeXnic Center" (or "Txc", or whatever you like) for the "Action".
Now comes the tricky part. If you do things in the usual fashion, under "Application used to perform action" you would type
"C:\Program Files\TeXnicCenter\TEXCNTR.EXE" "%1"but that does not have the desired effect. If you do that, each time you double click on a TeX file you'll start up a new instance of TeXnicCenter, even if one is already running.
One remedy is to instead type under "Application used to perform action" the following code:
"C:\Program Files\TeXnicCenter\TEXCNTR.EXE" /ddecmd "[open('%1')]"Note the single quotes around the %1. Here is another method that also works: Fill the "Application used" box in the usual fashion, but then check the box labeled "Use DDE". This makes more boxes appear. Now, in the box labeled "DDE Message", type
[open("%1")]Note that this time the %1 is surrounded by double quotes. See picture below.