Math software for Windows
General Tips for
Installing
and Using
Windows Software
by
Eric Schechter.
You may find these instructions
particularly useful if (i) you are new to the use of Windows,
(ii) you have just acquired a new Windows computer, or
(iii) you have just acquired some Windows software from an
informal source (e.g., from a download or from the Math Department's
CD, as opposed to a shrink-wrapped package). Latest alterations
to this page:
21 Feb 2006.
About filetypes
In the Windows operating system, filenames end with a period
followed by a few letters (most often 3 letters, though it actually
can be any number). Generally the file ending indicates the
type of file. For instance, "MYTHESIS.TXT" might be a textfile
containing your thesis, while "MYDOG.BMP" might be a
bitmap picture of your dog.
They don't have to be -- you can rename your files however you
like. You could rename "MYTHESIS.TXT" and "MYDOG.BMP"
so that each contains what you'd expect the other to contain.
But that will lead to confusion, not only for you, but also
for your computer. Your computer expects any file whose
name ends in "TXT" to be a textfile, not a picture,
and it treats that
file accordingly. For instance, if you double-click on that
file, you'll open a text editor, not a picture editor.
Following are some of the
most common filetypes. Your Windows operating system already knows
how to recognize and deal with most (but not quite all) of these.
You don't need to memorize this list, but understanding the basic
concept will probably be helpful.
First, there are the documents -- i.e., files
that you edit, and that contain your content:
- TXT -- plain unformatted text -- doesn't contain any
boldface, italics, or other formatting. Can be understood by all
word-processing programs. The default response to doubleclicking
in this is Windows Notepad
(see "Start" "Programs" "Accessories" "Notepad").
- RTF -- rich text format -- includes boldface,
italics, etc. Can be understood by many word-processors.
- WPD -- WordPerfect Document.
- DOC -- this abbreviation originally stood for "document", so
it could be anything -- even a long file of plain unformatted text. But
in recent years, it most often means a file formatted for Microsoft Word.
- HTM or HTML -- hypertext markup language -- this
is a web page. Actually, it is a plain unformatted text file, but the
text content is sprinkled with codes like "href=" and "<br>" that
can be understood by web browser programs like Netscape.
- BMP (bitmap picture),
GIF (graphic internet format),
JPG or JPEG ("Joint Picture Experts Group")
-- three common picture formats. For illustrations on web
pages, it is most efficient to use GIF files for pictures
with 256 colors or fewer (e.g., maps, diagrams, cartoons), or
JPG for pictures with more colors (e.g., photos), because
of the difference in how these formats encode the information.
- MPEG ("Motion Picture Experts Group") -- a
format for moving pictures.
- TEX -- source TeX file. This is really a file
of type "TXT", but it is used differently: its
content is sprinkled with codes like "\bf" and "\it"
and "$e^{i\pi}$" which can be understood by the program Tex.EXE. That
program is used by mathematicians and some other scientists and people
who need fancy document formatting. The default Windows configuration
does not recognize this filetype, so if you're going to work
with TEX files, you'll have to introduce them to Windows. I usually
set up my computer so that the default program triggered by doubleclicking
on a TEX file is TEXSHELL.
- DVI -- a picture format used for the main output of the
TEX.EXE program. Again, Windows doesn't know this one, and has to
be taught. The picture can only be viewed through special programs
called previewers (such as YAP.EXE), or converted to other formats by
programs such as DVIPS.EXE or DVIPDFM.EXE; I generally set
up my computer to respond to any DVI file with the YAP program.
You don't actually edit a
DVI file; but you can edit the TEX file that it came from, and then run
it through the TEX.EXE program to create a new updated version of the
DVI file. The abbreviation "DVI" originally stood for "device
independent", but that name isn't strictly accurate -- the same DVI file
may appear different on different computers, if they have different
kinds of fonts installed.
- PS -- postscript -- a picture format that can be understood
by some printers, especially laserprinters. This format is largely
device independent, because the file contains all the font information.
(Thus, if you're going to email a tex output to a colleague, or post it
on a website, you probably ought to convert it to postscript form first.)
Again, you don't edit these files readily; instead you edit the source
files that these came from, and then update the resulting ps files.
- PDF -- portable document format -- This is yet another
picture format. This format is used for many documents on the web,
by the US Government, the American Mathematical Society, and
some other large organizations. Converters (such as
DVIPDFM.EXE) or viewers (such as Acrobat Reader) are available
for free, but programs for directly editing PDF files are quite expensive.
- ZIP, TAR, ZOO,
ARC -- these are archive (compressed) files.
Files encoded in these formats generally
take up only about 40% to 70% as much space as
the original files, but they usually can't be used until they are
restored to their original format. Compression is often used for storing
files on CD-ROMs or on internet repositories,
to save space and also to save downloading time.
This also simplifies organizing: An archive
file may contain many compressed files, not just one,
and those files may even be arranged in directories
and subdirectories. To compress or decompress the
files, you need an
archive manager program.
Actually, almost all the archive files used for
Windows programs nowadays are in the ZIP format,
so you might get by with just a zip manager.
(Don't confuse zip files with Zip
Disks, which are high-capacity storage disks made by Iomega
Corporation. The two objects are entirely unrelated, despite the
identical names.)
- LNK and URL -- These are shortcut files, linking to
computer files or to web pages, respectively. You
won't actually see the endings ".lnk" or ".url" on filenames unless you
use a special program to reveal them, because those endings are
concealed most of the time. These files aren't really "documents" in a
traditional sense of the word, but I mention them here because you can
edit them very easily. Just right-click on the icon for one of these
files, and then alter any of the information that appears in any of the
boxes that show up. -- Files of type PIF are similar in nature to
LNK and URL but more complicated, and shouldn't be altered by beginners.
(PIF files are used by Windows to set parameters for old pre-Windows
programs.)
In addition to the documents, there are other filetypes. You generally
won't be editing any of these files, but it will help you to understand
what they are. To avoid confusion, you probably should keep all your
documents in one set of folders (such as C:\USERS\MYNAME or C:\MY
DOCUMENTS) and keep the other files in some other folders (such as
C:\PROGRAM FILES).
- EXE -- executable. This is a program. Typically, it
does things to documents -- e.g., display them, edit them, etc. Most
programs are of type EXE, but a few are of type BIN (binary) or
COM (command).
- INI -- initialization file. The executable file might look
in here for configuration settings or other special instructions when
it starts up. Advanced users sometimes need to alter an INI file, but
beginners should not. Usually, the INI file is a plain unformatted
textfile, so it should only be edited with an unformatted editor (like
Notepad), not a formatted editor (like Word). Similar use for
CFG and DAT files, though the abbreviation "DAT"
also is used for more specialized purposes by a few programs.
- DLL -- dynamic link library. Used by the executable. -- Many
problems with Windows are caused by missing DLL's. This can happen
especially because several different programs may use the same DLL. If
you uninstall one of those programs, it's supposed to check whether any
of the component files were shared, but occasionally an uninstaller
makes a mistake and removes a DLL that is still needed by another
program. If you're missing a DLL file, you might find a replacement
at
Rocket Download.
Or just type the full name of the missing file (including ".dll")
into a search engine such as Google, and you may find some
other place to get the replacement. ...
If you do find a replacement, most DLL's belong in either the
Windows directory or the Windows\System directory.
- INF -- installation information file. Used during
installation of programs. In some cases, you install a program by
right-clicking on its INF file and then clicking on the word "Install."
- MSI -- Microsoft Installation file. This is a program,
packaged in a self-installing format. Double-click on an MSI file,
and the program will install --- if your operating system knows what
to do with MSI files. If it doesn't, you should download and run
the program INSTMSI.EXE, described on
another web page.
- HLP -- help file. Most programs are accompanied by
instruction manuals which are in the form of HLP files.
These are not just plain textfiles containing some
helpful information, which can be read with any text editor
in any operating system. Rather, these are a particular filetype
which can only be viewed using a special program. You might
not notice that program as a separate program, because you
usually view a HLP file by
clicking on the word "Help" which appears at the
top of some program's screen. When you do that, you're actually
starting up another program, one that is designed for viewing
HLP documents. It is called WINHLP32.EXE or something like that;
the precise name may vary from one version of Windows to another.
-- By the way, a few older programs are accompanied by
plain textfiles whose names do end in ".HLP". If you see
one of these files in your directory and you double-click on it,
Windows will attempt to view it through its HLP-reader program
and will fail, and will give you an error message -- something
like "This is not a Windows Help file." If you get a message
like that, try reading the file with an ordinary text editor
and see what happens.
- CHM -- compiled html help file. This is a later format for
help files. Viewing this type of file requires a program, "HH.EXE", not
present in earlier versions of Windows, but you can download
a copy for free.

Some additional information about filetypes can be found at
How Microsoft hid the filetypes and how hackers take
advantage of that fact and how you can fix it
Filetypes are very useful information, but that information is
initially concealed from you by Microsoft, because
Microsoft doesn't want to frighten beginners with an
information overload. Their attitude is
"don't worry, be happy." You can guess filetypes by looking at the
different pictures -- each filetype gets its own icon. But
different versions of Windows may use different icons,
making it hard for us to discuss the filetypes. We'll all
speak the same language more easily if you make your
computer show you the filetype extensions.
Open up either "My Computer" or "Windows Explorer", and
click on the word "View" that appears at the top of the
window. On the resulting menu, click on the bottom
item, "Folder Options." (See first picture. If you're
using Windows m.e., the instructions are slightly different:
click "Tools", then "Folder Options.")
On the resulting display, click
the second tab, which again says "View". (See picture below.)
The way Microsoft sets things up (in the default
Windows setting), the box labeled "Hide file extensions for known file
types" initially is checked. I urge you to uncheck it; I
think you'll end up understanding your computer better as a result.
For instance,
two files named "Tex" with different icons may now show
the filenames "Tex.TXT" and "Tex.EXE" -- for textfile and
executable, respectively; I find that much less confusing.
Microsoft's system of hiding the file extensions has been
a key loophole used by some hackers to implant viruses. A hacker might
create a virus in a script file (SCR) or a Visual Basic Script file
(VBS) , and then name the file "MYTUNE.MP3.SCR" or "MYDOG.BMP.VBS". If
you haven't corrected Microsoft's concealing of the filename endings,
all you would see is "MYTUNE.MP3" or "MYDOG.BMP". You'd think, "oh,
it's just a music file or a bitmap picture file, perfectly harmless",
and you might doubleclick on it -- whereupon the deadly script would be
launched. (Besides SCR and VBS, hackers may also use EXE, COM, BAT,
PIF, and probably a few others that I don't know about yet.)
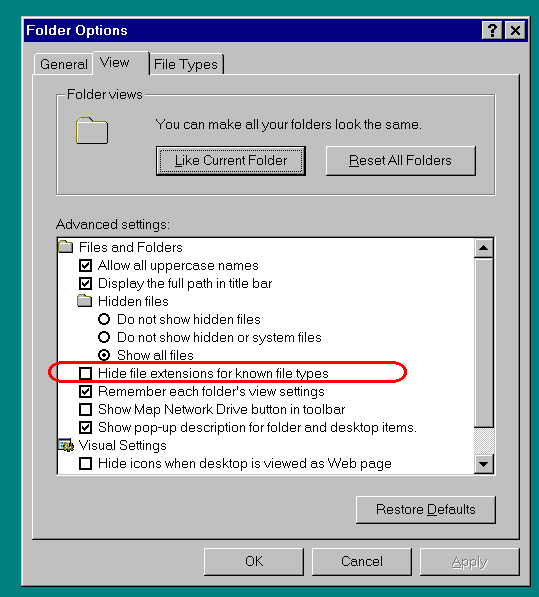
While we're at it, I also recommend that you check "Display the full
path in title bar", so that it will be easier for you to figure out what
directory you're looking at.
Eventually, you may also want to
check "Show all files" (replacing the default setting of
"Do not show hidden or system files") for various reasons -- e.g.,
- you need to alter the AUTOEXEC.BAT file
to make your TEX program work correctly; or
- you want to find the "C:\Windows\Desktop" directory
and make a shortcut icon for it.
But be careful. Microsoft initially hid those files
from you for a good reason. If you mess up a system file,
you may have difficulty getting your computer
to work properly.
Double-click and Right-click
The term "double-click"
refers to clicking twice on an
object, with the left (usual) mouse button, with
very little time between the two clicks.
(By the way, you can adjust the timing to your own liking -- just go to
"Start" "Settings" "Control Panel" "Mouse".)
In
Windows Explorer, if you double-click on a filename, you get
the effect that is the "primary association" with the
filetype you've clicked on. For example, if you
double-click on a file named
"Example.TXT", you'll probably start up the
program "Notepad" and load the file "Example.TXT" into it,
because (unless you've altered the associations) the default
association with the "TXT" ending is Notepad. When you
apply the primary association, it is said that
you Open the file.
The term
"right-click"
refers to clicking once on an object,
with the right mouse button. This brings up a menu of
secondary options -- i.e., the various actions that are
associated with that filetype or with all filetypes.
For instance, I've configured my computer so that
several different options are associated with TEX
files. When I right-click on a TEX-file, I get a result
like the picture shown below.
- "Open" is always an option. Generally
it will yield whatever
is the primary association, or
default program (i.e., the same thing as the
double-click). On my computer, the primary association
with TEX files is TeXShell.
- "Leo", "Emacs", "Nextpad", and "Emtex" are the secondary
associations that I have installed for TEX files on my computer.
(In case you're wondering, Leo is a commercial
product, not freeware.)
- "Send To", "Cut", "Copy", "Create Shortcut", "Delete", "Rename", "Properties"
are always
available for any file, as part of the default setup
of the Windows system.
- "Pfe edit txt", "Irfan edit pix", "Star Office", "Split this file",
"Filenote" are (on my computer) additional options for any file,
because I have added them.
(Probably I should remove a few options -- I've added so many
things to the list that now it takes me a few seconds to find
the one I'm looking for!)
The "Send To" option is particularly interesting. If you click
there, it opens up a submenu, which shows all the shortcuts listed in
the directory "C:\Windows\SendTo". A few shortcuts, such as "Desktop
(create shortcut)", are already there by default -- i.e. as part of the original
Windows setup. But you can add whatever shortcuts you like to that
folder. (Or delete shortcuts that you're not using -- but I would just
move them elsewhere, in case you change your mind later.)
In fact, you can even create subfolders, in which you can put
more shortcuts. In the picture, you can see that my SendTo directory
contains, among other things, a folder that I've created called "Edit
text", which contains shortcuts to several of my favorite text editors.
Thus, those editors are just a few clicks away if I right-click on
any file, regardless of what are the associations for its
filetype.
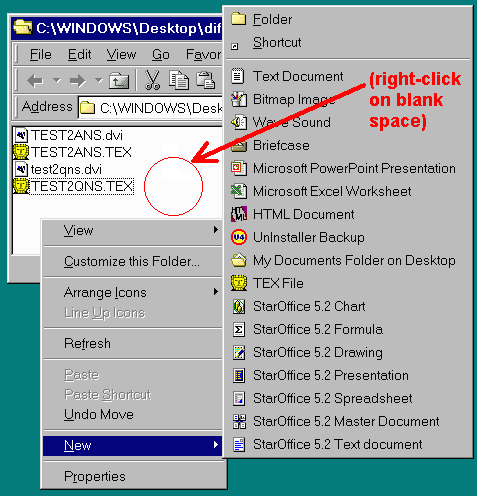
The right-click technique works in places you might not expect. For
instance, if you right-click on some blank space
in a folder, you'll get a list of actions that can be
applied to that folder (see illustration
below). One of the options is "New" -- you're being offered the
opportunity to create a new file inside that folder. Click there, and
you'll get offered a list of filetypes to choose from, for the new file.
Note that the first filetype on the list is "Folder"; click
there to create a new subfolder inside the folder that you started from.
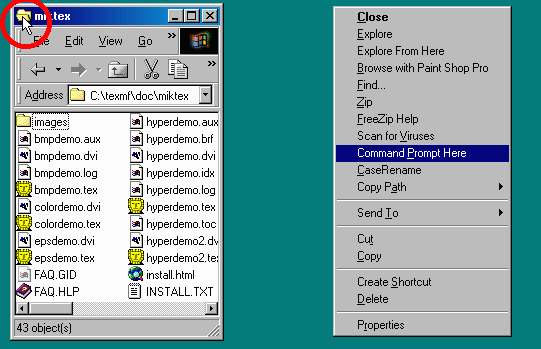
Still another interesting place to right-click is on the little
picture of an open manila folder, displayed in the upper left corner of
Windows Explorer. (See illustration below.) This is the place to click
if you want to use the Case Rename program, or use the
"Command Prompt Here" program which is part of the Powertoys package. Also, if you've
installed the program FreeZip, you can click on the word "Zip" on
this menu to create a zip file containing the contents of the current
directory.
Right-clicking also works in a few programs besides
Windows Explorer. In particular, it is important in Netscape (see
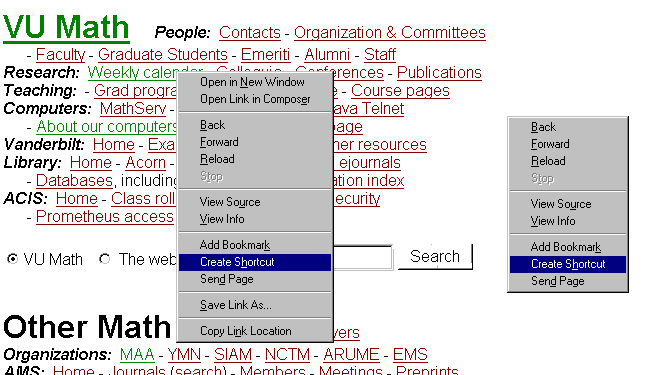
illustration below).
We get many options by right-clicking on a link, or somewhat
fewer options by right-clicking on blank space on the web page.
By the way, in the last few pictures, the "Create Shortcut"
option would make a "LNK" file (for a shortcut to a program or
other file), but in the picture below, the
two "Create Shortcut" options would make a "URL" file
(to a web page, either on the internet or on the hard disk).
Some good places to put shortcuts
A shortcut is a tiny little file, generally less than a half a kilobyte
in length. That's next to nothing, by today's storage standards.
So you should feel free to make as many additional shortcuts
as you like; I can't imagine them adding up to enough space to
be noticeable. Put them wherever you find it convenient.
You can use them to call up a program from other locations
in your computer. You'll find lots of them under
"Start" "Programs"; that's the same as
"C:\WINDOWS\Start Menu\Programs".
But you can copy them to other locations too.
(I recommend that you don't alter the
"C:\WINDOWS\Start Menu\Programs" directory
-- keep those shortcuts just the way the installers
put them, for later reference.)
I have observed that most Windows beginners don't
make any shortcuts of
their own. Their desktops are cluttered with many icons,
generally in disarray -- some icons that were already
on the desktop when the computer was purchased, and
some that were added by
the installers of some programs. The desktop also
has a background picture that may be pretty or
fun but distracts slightly from one's work -- almost
like trying to read while the radio is playing.
(My children claim that the radio helps them read;
I've never understood how that is possible.) On the
other hand, the beginner's desktop generally contains no
documents; those all end up wherever the editor program
decides (by default) to store them. In many cases that is
either the "My Documents" directory or whatever directory
contains the program doing the editing.
My own arrangement, arrived at by conscious choice after years
of experiment and experience, is almost the opposite of the
beginner's. On my
desktop, I have no shortcuts
to programs, but I do keep on the desktop either the documents that I'm
currently working on, or shortcuts to the folders containing the
documents that I'm currently working on. I also put extra shortcuts
to programs
in the Start menu and the utility tray. I will describe my own system;
perhaps you'll find that some part of it is useful for you as well.
Here's one way to make a shortcut:
- Open up two copies of Windows Explorer.
In one, you should open (FP) the Folder containing
the Program or other object to which you
want the shortcut pointing. In the other,
you should open (FS) the Folder in which
you want to create the Shortcut.
- Hold the mouse cursor over the icon or filename
of (P) the program to which the shortcut should point.
- Press down with the right
mouse button; don't let the button back up.
- Now, still holding
the right mouse button down, move the mouse cursor
until it is over (FS) the folder in which you want the shortcut.
- Let go of the mouse button. A little menu will appear.
One of the options is "Create Shortcut(s) Here". Click on that option
with the left mouse button.
Here are some interesting variants on that technique:
- One of those two folders -- i.e., the folder (FP) containing
the project or the folder (FS) receiving the shortcut --
can be the desktop itself. The desktop is actually
just a special folder -- you can view it as
"C:\WINDOWS\DESKTOP", or view it on the
screen of the computer.
- You can make shortcuts to things other than programs.
For instance, you can make a shortcut to a folder.
In the directions above, object
(P) can actually be a subfolder contained in folder (FP).
- That folder to which you make a shortcut could
even be the desktop folder itself. Personally,
I find this shortcut very useful. Below is a picture
of the properties display for this shortcut. You might
notice the picture of a desk lamp in the upper left
corner; that's what I've chosen for the icon for
this shortcut. The default icon was just a picture
of a manila folder, but I like something a little
more pictureseque. You can change any icon's
shortcut by clicking on its "Change Icon ..." button.
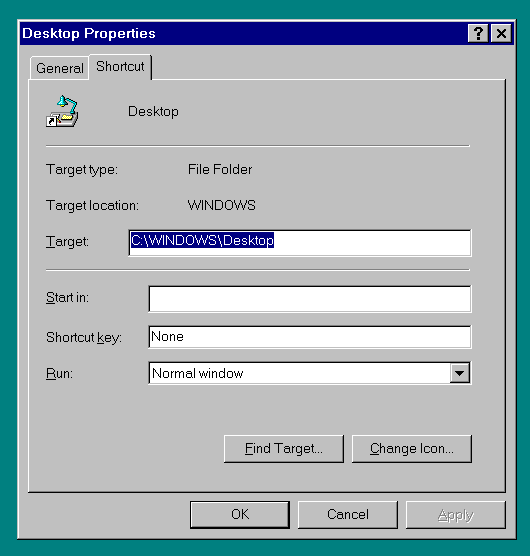
(In case you're wondering
where I got that picture of a lamp, it's copied from the
"Deskmenu" program in Powertoys.)
-
You can put shortcuts into the Start menu,
and they will be part of that cascading tree arrangement.
I generally avoid altering the part labeled
"Start" "Programs", because the automatic install and
uninstall programs expect to find specific things there.
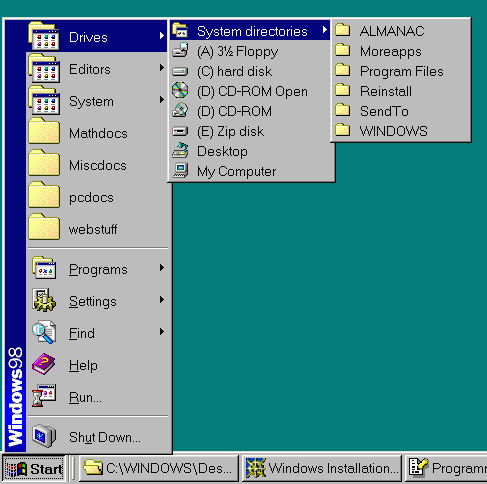
Instead I add shortcuts above the "Programs" section.
For instance, I have shortcuts to my main directories, to
make them easy to get to. See illustration below.
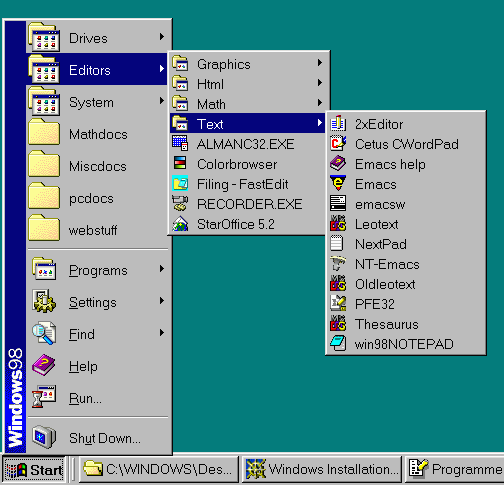
I also have shortcuts to editor programs.
See illustration below. I've also copied most of those
shortcuts into my "SendTo" directory (discussed earlier).
- In bottom row of my screen, I've
added some tiny icons that are shortcuts to a few things that I use often.
See illustration below.

If you're using an old version of Windows (e.g., Windows 98 first edition or Windows 95),
you can add those tiny icons with a program called Tray Shortcuts, part
of our free utilities collection. In more recent versions of Windows, you can just use
the Quick Launch toolbar, which displays the shortcuts stored in
C:\WINDOWS\Application Data\Microsoft\Internet Explorer\Quick Launch
Right-click on the bottom row of your screen to see the possibilities for toolbars.
- For the filetypes that I use most often, I've
added associations to the programs that I use most
often (discussed later in this document). Thus, if
I just double-click or right-click on any document
that I'm working on, the appropriate editor comes up.
- You may find it convenient, and perhaps important, to modify the
commands that are built into a shortcut. Just right-click on any
shortcut icon. On the resulting menu, the bottom item is "Properties";
click there. On the resulting display, the second tab is "Shortcut";
click there. The resulting display has several boxes that can be
altered (see illustration below).
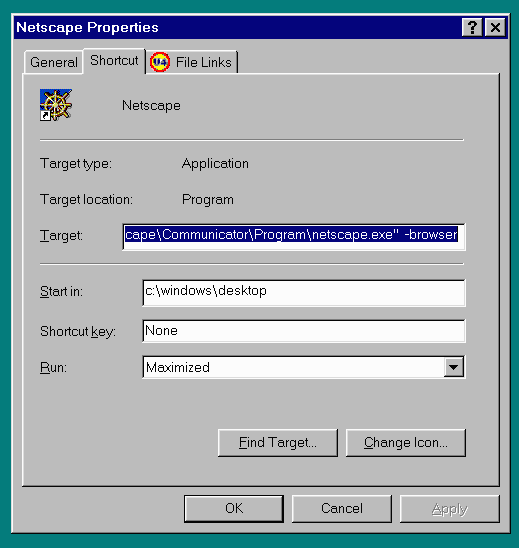
- In the window titled "Target:", you may want to put quotations marks
around the file path, to counteract any ill effects from spaces in the
middle of the filename (e.g., if the path goes through the directory
"Program Files").
- Also in the window titled "Target:", you may want to add some sort
of command line parameters, if there is some particular way that you
want the program to start. In the illustration, for instance, I've
added "-browser" so that, when I click on the Netscape shortcut icon, it
starts in browser mode. You may be able to find lists of available
command line options for various programs, in the documentation that
accompanies those programs.
- In the window titled "Start in:", I usually like to put
"C:\Windows\Desktop". That way, any files that I create with the program
will be placed on the desktop, unless I give them some other path
overruling that one. With this technique, I have no trouble finding my
files and moving them to appropriate directories.
- In the window titled "Run:", you can specify whether you like the
program to start out full-screen, iconized, or somewhere in between.
Don't just accept the default -- decide what you like, and then demand
that you get what you like.
Changing your file associations
How do you change the lists that are displayed on a right-click?
For instance, how did I get TeXShell to be my primary association
for TeX, and get Leo as a secondary association?
New, easy method by adding another program
Use the program
OpenExpert.
Old, standard method (built into Windows)
This method is more difficult, and it easily gets messed up
by other programs.
Open up either "My Computer" or "Windows Explorer", and
click on "Tools". (In some older versions of Windows you
need to look under
"View" instead of
"Tools.") On the resulting menu, click on the bottom
item, "Folder Options."
On the resulting display, click on
the third tab, "File Types". Now type some letter -- for
instance, "T" -- to quickly scroll down to the filetypes
that begin with "T". If the filetype you want isn't there,
you can add it by clicking on the "New" button and answering
the questions that show up.
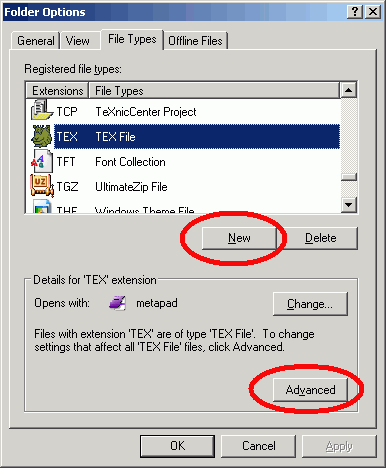
The "Change..." button changes what is the one
program that always comes up with this filetype. But
what we want is the "Advanced" button, which brings up
the "Edit filetype" dialogue.
Pictured below is the "Edit filetype" dialogue for the type
TXT (ordinary textfiles), but the same technique works
for other filetypes -- TEX, PS, DOC, PDF, or whatever.
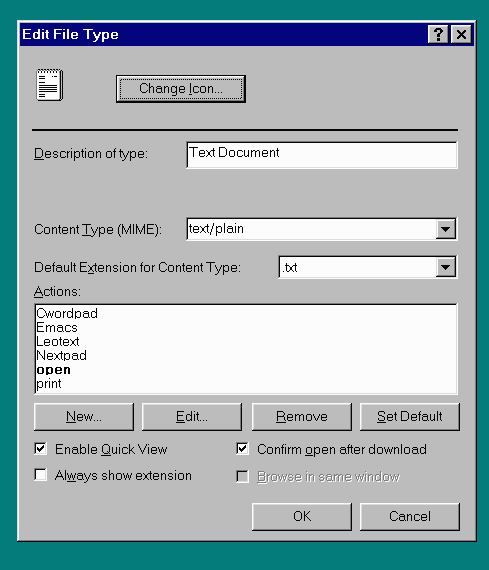
You will see displayed all the actions that are already
associated with the filetype ".txt". You can change all sorts of things:
- change the icon picture that your Windows Explorer uses for that filetype
- change the phrase describing that filetype
- change the mime type (experts only)
- New: add an action
- Edit: alter the properties of an action
- Remove: subtract an action from the list
- Set default: If you click
this button after selecting one of the actions
on the list, that action will be listed in boldface,
and it will be the default action
(until you change it again). That means
it's the action which occurs when you
double-click on a file,
as discussed
earlier.
The other actions are accessible
from the context menu that shows
up when you right-click on a file.
For instance, after clicking "New",
you could add the Action "NextPad": Type that program name
into the "Action" box
(or any name you like; this part is what you'll
see on the context menus later).
Then click "Browse"
to find the program that you want in the "Application used to perform
action" box.
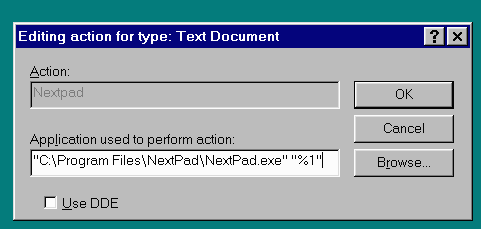
You'll find something like
"C:\Program Files\NextPad\NextPad.exe"
in that box. But here is a trick: You may find it useful to modify
the contents of that box, so that it says
"C:\Program Files\NextPad\NextPad.exe" "%1"
instead. The %1 gets replaced by the filename that you've
right-clicked on, and the quotation marks serve as delimiters to tell
the operating system that any blank spaces or other unfamiliar
characters encountered, in either the name of the program or the
name of the file to which the program is to be applied,
are part
of the filename, not the end of the filename.
I've seen this work sometimes,
honest; it can make all the difference between a smooth
operation and an error message.
To be safe, you probably should put quotation
marks around both the command path and the
%1, as I've done in the illustration above.
Without the quotation marks, some programs
will get tripped up by spaces in the command path
or the document path -- e.g., the space between
the two words in "Program Files". In cases where
the quotation marks aren't needed, they won't
hurt. (Microsoft sometimes doesn't automatically put the
quotation marks in; I guess that's because
Microsoft programs don't need them.)
In a few extreme cases, even the quotation marks
won't overcome the problem with spaces, and
you may simply need to move your files and
programs elsewhere.
- I keep some of my
programs in subdirectories of a directory named
"C:\moreapps" (instead of "C:\Program files"),
and
- I keep my documents in subdirectories
of a directory named "C:\docs" (instead
of "C:\My documents").
The technique with "%1"
also makes it easier to start up DOS programs -- i.e.,
programs which are designed for the Microsoft operating system that
preceded Windows. For instance, I have a copy of
TtH
(TeX to HTML), a program for converting Plain TeX or LaTeX documents
into HTML documents. The instructions say to start it at a DOS prompt.
However, if you're going to run it in its most basic mode of operation --
i.e., without any command switches -- then the startup command is just
"tth filename" where filename is the filename of the input TEX file.
In that case, we can automate the procedure, and not bother with
a DOS prompt. Just add this action to the filetype TEX:
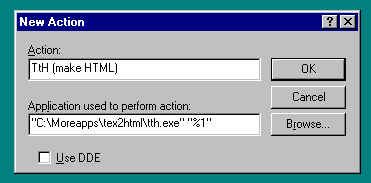
Now, to start up TtH, just right-click on the filename of the TeX file,
and then click on the option TtH. (Of course, if we want to run the
program with any of its option switches, then this technique won't work,
and we'll still have to resort to a DOS prompt, or else add more
actions to our right-click assocations list -- e.g., several modified
versions of the TtH command.)
Following are a couple more examples, to finish this topic off.
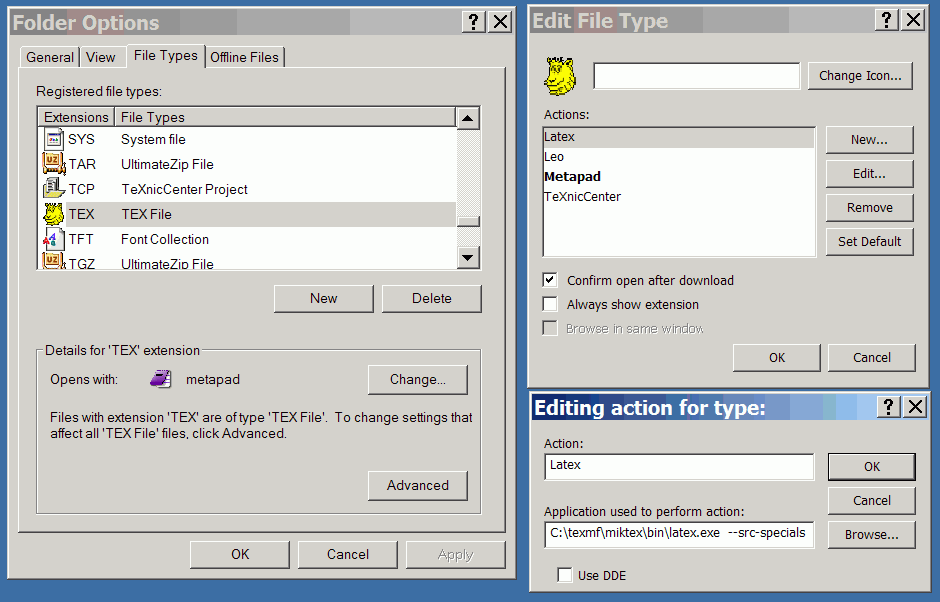
When I right-click on any "tex" file on my computer, one of the options
that comes up is "latex". I get that with these settings:
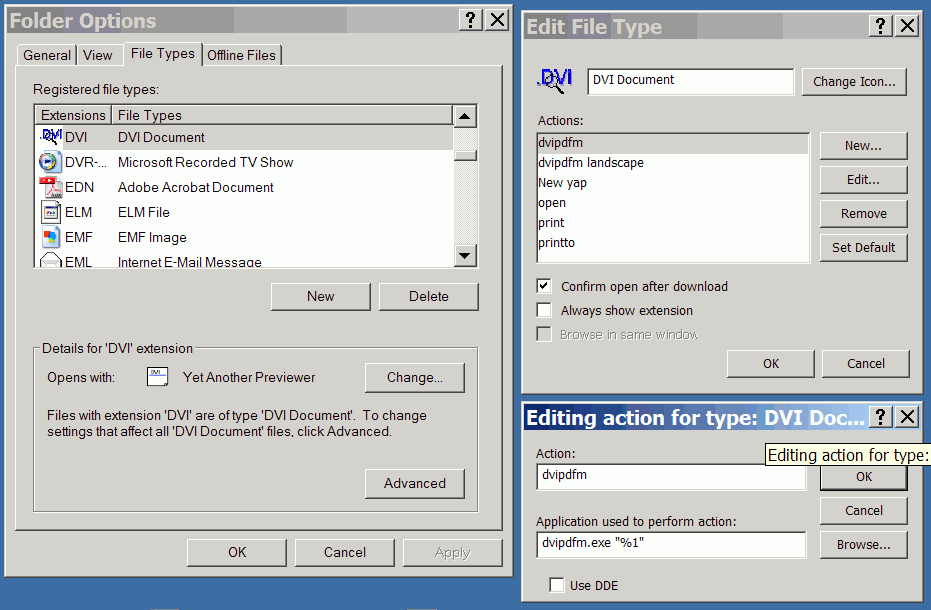
And when I right-click on any "dvi" file, one of the resulting options
is "dvipdfm", obtained this way:
About downloading and unzipping files
When you download a program from the internet, one of the first
things you'll need to know is: Where did my downloaded file go?
You might have trouble finding the file. If you've never configured
your browser for the download location, then probably the file
will end up in the same directory as the browser itself ---
for instance, your downloaded file might end up in
the directory "C:\Program Files\Mozilla Firefox" if you've been using
the Firefox browser.
It's a bit of a bother to have to go looking for your downloads;
it's better to tell the program where you want the files. I usually
download files onto my desktop --- i.e., into the directory
"C:\Documents and Settings\personal\Desktop"
--- though I only keep the file there temporarily, since I don't want
to get my desktop overly cluttered. Most browsers will give
you the opportunity to specify the location, at the time of
downloading. Firefox also allows you to, at any time, specify a default
download location; just go to
"Tools" "Options" "Downloads."
As we mentioned earlier,
most downloaded freeware programs are stored in
a compressed archive format --- most often as
- a zip file (e.g., "myeditor.zip"), or
- a gnuzip file (e.g., "myeditor.gz"), or
- a self-extracting compressed file (e.g., "myedit_setup.exe").
(To tell what kind of file you've downloaded, you'll need to be able to see
those 2- or 3-letter file endings. If you can't see the file endings,
you need to unhide the file extensions,
explained earlier on this page.) For any compressed file other than a
self-extracting one, you will need an archive manager already installed.
Probably you already have one. If not, you will discover your lack when you
get to the marked (*) step below. You can get a free archive manager
from this list.
Before you decompress the file, you'll want to move it to a directory of its own.
Indeed, if you decompress it where it is (e.g., on your desktop), the several files
contained in it will get mixed in with the several files already on your desktop,
and it may take a long time to straighten all of that out. So here are your next
few steps:
- Create a new, empty folder, wherever you wish, with
whatever name you wish. Personally, I find it convenient to create
a folder on the desktop, and to name it "TEMP" (to remind myself
that it's not supposed to stay there).
- Move the compressed file into that subdirectory, so that
it is the only file in that folder.
- Next, you need to unarchive the file. The procedure depends
on the file ending.
- If the file name ends in ".exe", then just double-click on it. It will unarchive itself. If it is not just an archive, but an installer, it will do a lot more than decompress -- it will also continue with the installation process. In that case just read the instructions as it goes.
- If the file name ends in ".zip" or ".gz" or ".gzip" or ".tar" or ".tgz" or something else of that sort, then you should click on it with your right mouse button. This will bring up the "context menu", a list of options of what can be done with the file. If (*) your archive manager is properly installed, among those options should be the option to extract the files from the archive. Select that.
- If the program hasn't already installed itself by now, you're
ready for the next step in the installation process. You now have a folder containing one or more
files (and perhaps some subfolders). Look for a file named
"SETUP.EXE" or
"INSTALL.EXE" or something like that.
- If you find one, that is the automatic installer, discussed further below.
- If you don't find one, then the program you have downloaded has no automatic installer. This case is also discussed further below.
Using automatic installers
Automatic installers (if present) usually work quite well, and so I
use them. In most cases, the directory containing the installer
program should be viewed as
a temporary directory. It installs the new program
elsewhere (see below). After it's done, you can delete the temporary directory
and all its contents -- i.e., you can delete the installer and the directory
that it is in.
There is one common malfunction of autoinstallers that
I'd watch out for:
In most cases, the installation program
suggests a "default directory" where it would like to
install the files, and then it gives you the opportunity to
specify some other directory instead. Usually the default
directory is one of these:
- C:\Program name
- C:\Manufacturer's name\Program name
- C:\Program Files\Program name
- C:\Program Files\Manufacturer's name\Program name
I've often been
tempted to specify some other directory, because I don't
like the filenames that the installation program suggests.
But I have learned from experience that it is generally best
to accept the "default directory". That is because, in more
than a few cases, there is an error in the program, and the
program will malfunction -- perhaps not immediately, but
after a while -- if you install it in some directory other
than the default directory. (My guess is that this occurs
because the people who wrote the program didn't test it
extensively enough, and they got used to having it installed
in their favorite location.) Save yourself some trouble, and
install the program where its authors envisioned it.
Programs that lack installers
What if there is no SETUP.EXE or INSTALL.EXE?
In that case, follow this procedure:
- Create a new, permanent directory (see remarks below about
where to put it).
- Move all those files from the installation package
(in the TEMP directory) into the program's permanent
directory.
- One or more of the ".EXE" files in that directory
are programs that you'll want to run. Try double-clicking
on them to see what happens; then make shortcuts
to any that you expect to use.
Put the shortcuts in whatever location
is convenient for you. (See my earlier
discussion about where
to put shortcuts.)
- You may also need to modify
those shortcuts slightly, as explained below.
Now, choosing the permanent location for the program
files is a bit
tricky. A program that doesn't come with an installation
routine is an old-fashioned program, written by an
old-fashioned programmer, and some parts of it might not be
fully compliant with modern Windows practices. In
particular, the program might insist on following
pre-1995 filename rules. The pre-1995 rules
were that
any
directory or subdirectory name should be at most 8
characters, and most non-alphabetic characters were
prohibited. Within a directory, a filename (other than
the name of another subdirectory) should be at most 8
characters, followed by a period, followed by at most 3
characters; and again those most nonalphabetic characters
are prohibited.
In particular, the directory
"C:\Program Files"
which is all-important in Windows 95 and later, has a
filename that is illegal by pre-1995 rules! In other
words, Microsoft has set things up so that the
place where most modern Windows programs
are installed is not suitable for old Windows programs!
I'm not sure why Microsoft did that --
I think they're just begging for trouble.
(Or maybe in 1995 they started thinking about
ways to make you throw out all your old software
and buy new software.)
My remedy is that, when a program is not self-installing,
I do NOT put it in "Program Files". Instead, I create a
subdirectory called "C:\Moreapps" (note that that's only
8 characters after the slash), and then I create
subdirectories under that. For instance, if the program is
called "Widget Magic", I would copy its files into a
directory named
C:\Moreapps\Widgmagc
(again using only 8
characters after the slash). The executable might have a
path like "C:\Moreapps\Widgmagc\widge.exe".
The PATH environmental variable
When your computer is starting up,
even before it displays a pretty screen saying "Microsoft Windows",
one of the first things it does is to look in several technical configuration
files -- among them,
- C:\CONFIG.SYS
- C:\AUTOEXEC.BAT
- C:\WINDOWS\SYSTEM.INI
- C:\WINDOWS\WIN.INI
- C:\WINDOWS\PROTOCOL.INI
These are plain, unformatted textfiles, so if you ever need to edit them,
use an unformatted editor such as Notepad -- not a formatted editor
like Word or Wordperfect. You can look at these files if you want, but
be careful not to change them unless you're sure you know
what you're doing -- if you mess them up, your computer won't
work right.
For some of our software -- particularly our TeX programs -- we probably
will need to make one small change in the "C:\AUTOEXEC.BAT" file.
One or more lines in that file are used to set the PATH variable. The
PATH variable is an environmental variable that tells programs where
to look for files they might need. If a program is looking for a file
and doesn't have explicit instructions on where to find that file, it
will look in all the places along the PATH. A typical PATH setting
in an old Windows 3.1 computer would be something like
PATH=C:;C:\WINDOWS;C:\WINDOWS\COMMAND
which means "if you don't find the file you're looking for, try looking
in my C: directory; and if that doesn't work, try looking in my C:\Windows
directory, and then try looking in my C:\Windows\Command directory."
(In case you're wondering, this stuff is not case-sensitive -- i.e., it
doesn't matter whether you use capital letters, lower-case letters,
or a mixture of the two.)
Most modern programs supply all the file information they need, so
they don't have to bother looking at the PATH variable. But the
TeX program is legacy software -- it has been handed down from
earlier operating systems, with only moderate alterations.
Some of the TeX-related programs will expect your main TeX programs
to be located someplace that is on your path. For instance, where
your Tex programs are located depends on which version of
Miktex you're using; for some versions, the programs
are located at
- C:\TEXMF\MIKTEX\BIN\tex.exe
- C:\TEXMF\MIKTEX\BIN\texify.exe
- C:\TEXMF\MIKTEX\BIN\dvips.exe
- C:\TEXMF\MIKTEX\BIN\yap.exe
- C:\TEXMF\MIKTEX\BIN\latex.exe
- C:\TEXMF\MIKTEX\BIN\makeindex.exe
- etc.
Then you will need to have
as part of your PATH. This can be accomplished by adding to your
AUTOEXEC.BAT file, a line that says
set PATH=%PATH%;c:\texmf\miktex\bin
The effect of that line is to add the desired string to the end of your
PATH variable. -- Miktex 2.0 makes an analogous change
automatically for you in your
AUTOEXEC.BAT file, but then you need to reboot to make this take effect.
You have to be careful what you put into your PATH variable,
for a few reasons: (1) If your PATH is too long, the operating system
may take a long time to find what it's looking for. (2) If your PATH includes
two or more directories containing files that have the same name, the
operating system may sometimes find the wrong file. (3) If your PATH
is too long, the operating system will simply ignore the end part of it.
(4) Most important, if you put some unacceptable characters into your
PATH line, then your PATH will be corrupted, and
the operating system won't see the rest of the line.
For instance, I once accidentally set my path to something like this:
PATH=C:;C:\WINDOWS;C:\WINDOWS\COMMAND;c:\Program Files;c:\texmf\miktex\bin
And then my TeX programs didn't work right. The problem here is that
the PATH variable has to follow the pre-1995 filename rules, but the
all-important filename "Program Files" does not follow those rules.
My operating system ignored everything after the blank space in the
middle of "Program Files", and so it couldn't find my TeX programs!
This was easy to fix, after I figured out what was causing the problem.
Scheduled events
 The Task Scheduler can be seen as an icon in the system tray, usually
kept in the lower right corner of the Windows screen -- it looks like a calendar, a day planner book, and a clock. If you double click on it,
you'll bring up the Task Scheduler program, which can be used
to schedule various tasks.
The Task Scheduler can be seen as an icon in the system tray, usually
kept in the lower right corner of the Windows screen -- it looks like a calendar, a day planner book, and a clock. If you double click on it,
you'll bring up the Task Scheduler program, which can be used
to schedule various tasks.
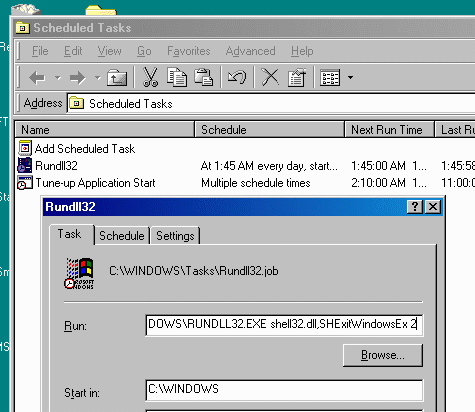 For instance, our department's Windows computers
(the ones in the computer room) generally
are left running 24 hours a day, but any Windows computer
should be rebooted at least once a day (to avoid
excessive loss of allocatable RAM and other corruption
problems that are common in the Windows operating
system). So I've scheduled our department's computers
to reboot themselves each day at 1:45 AM. This can
be done using the command
For instance, our department's Windows computers
(the ones in the computer room) generally
are left running 24 hours a day, but any Windows computer
should be rebooted at least once a day (to avoid
excessive loss of allocatable RAM and other corruption
problems that are common in the Windows operating
system). So I've scheduled our department's computers
to reboot themselves each day at 1:45 AM. This can
be done using the command
C:\WINDOWS\RUNDLL32.EXE shell32.dll,SHExitWindowsEx 2
which reboots the computer. Schedule that
command for every 1:45 AM and the rebooting
will take care of itself. Similarly, you might set
the computer to run Scandisk once a month,
to check for and correct physical
errors on the hard disk.
In a similar fashion, I also set up the computers
to update the antivirus definition files once a week, and
to scan the entire hard disk for viruses once a month.
However, I don't use the Windows scheduler for
those tasks -- our university uses McAfee Antivirus,
which has its own scheduling system.